Art Anarchy
Would you like to react to this message? Create an account in a few clicks or log in to continue.


Are you an artist? Writer? Musician? Or maybe just a creativity appreciator who likes to support others. Do you want to take the web back from the hands of CEOs and social media and algorithms? Join us. Let's revive the web.
 
HomePortalCalendarLatest imagesFAQSearchMemberlistUsergroupsRegisterLog in


 Kandi (plastic bead jewelry) Thread

Go down 
2 posters
AuthorMessage
ocpdzim

ocpdzim


Posts : 63
Reputation : 0
Join date : 2023-07-18

Kandi (plastic bead jewelry) Thread  Empty
PostSubject: Kandi (plastic bead jewelry) Thread    Kandi (plastic bead jewelry) Thread  I_icon_minitimeTue Jul 18, 2023 5:12 pm

Recently, a friend of mine showed me how to make Kandi bracelets and cuffs, and I thought I'd like to share what I learned here! I won't be posting pictures of my projects since I worry they're too identifiable since I wear them sometimes, but feel free to share yours if you'd like. In the meantime, here's some info about how to get started making kandi plus a tutorial I made for how to create an x-cuff. I'd love to see any tutorials you have, too!

Links to tutorials later in the thread:

Peyote Cuff Tutorial

Flower Cuff Tutorial

Supplies you'll need:

  • Kandi cord - this should be elastic cord, with a thin coating of fabric. It shouldn't be too thick, 1 millimeter is usually good. It comes in many colors.
  • Pony beads - these are plastic beads with a large hole. The basic ones are round and you can get a set with a lot of different colors either online or at a craft store.
  • Optional extra beads - different shapes of beads that aren't just round, stars and hearts are common but you can find all sorts of things - bells can also work, for instance. If you're going to be using them for an x cuff or other complicated project, be sure they have a big enough hole to put your cord through 2 or 3 times.


The most simple way to make kandi is to just put a bunch of these beads on a string and then tie it off once it's about the right size for your wrist. This is fairly self explanatory.

When making kandi, it's good to use a lighter to burn the ends of string and any knots that you tie, so they stay better and don't fray. However, this is not essential, and I don't usually do it because my hand problems make it hard for me to use a lighter safely.

An x-cuff is a somewhat more complicated style of kandi that's sort of 3 dimensional. It has a flat base that's fairly tall and goes around your hand, and then a second layer of decorative stuff on top. There are tutorials for this online already, but frankly, I couldn't find one that was easy for me to follow, so I hope this is helpful to someone.

Kandi (plastic bead jewelry) Thread  F6ee1ac5b2f066e15a08b2e57b87c16cb2255f28

You can modify this for a bigger wrist or to wear higher on your arm by extending the same pattern. The size shown here should work for small to medium wrists - my wrists are very small and it's loose on me, but doesn't fall off because my hand blocks it from doing so.

For this particular size, you will need the following, labeled with descriptions + their color in the tutorial:
  • 10 of your special accent bead (pink star)
  • 40 of the bead that goes in a line around the top and bottom of the kandi (cyan)
  • 30 of the bead that goes in between the sets of line beads and interior x beads (green)
  • 40 of the bead that makes the 2D x's inside your cuff (yellow)
  • 40 of each color bead for the 3D x's around the accent beads (orange and purple)
  • Roughly 90 inches of cord for the main cuff
  • Roughly 65 inches of cord for the 3D x's


If you run out of cord while making your kandi, don't panic, just tie more cord on the end and continue.

Kandi (plastic bead jewelry) Thread  9c84bef325abf9a3a42ad83f686d55114c66b3f8

For step 1, just string beads on in this pattern. There should be 20 line beads in sets of 2 with a total of 10 in between beads.
Kandi (plastic bead jewelry) Thread  E224bb4067d44711dbb9881738483d229b6751af

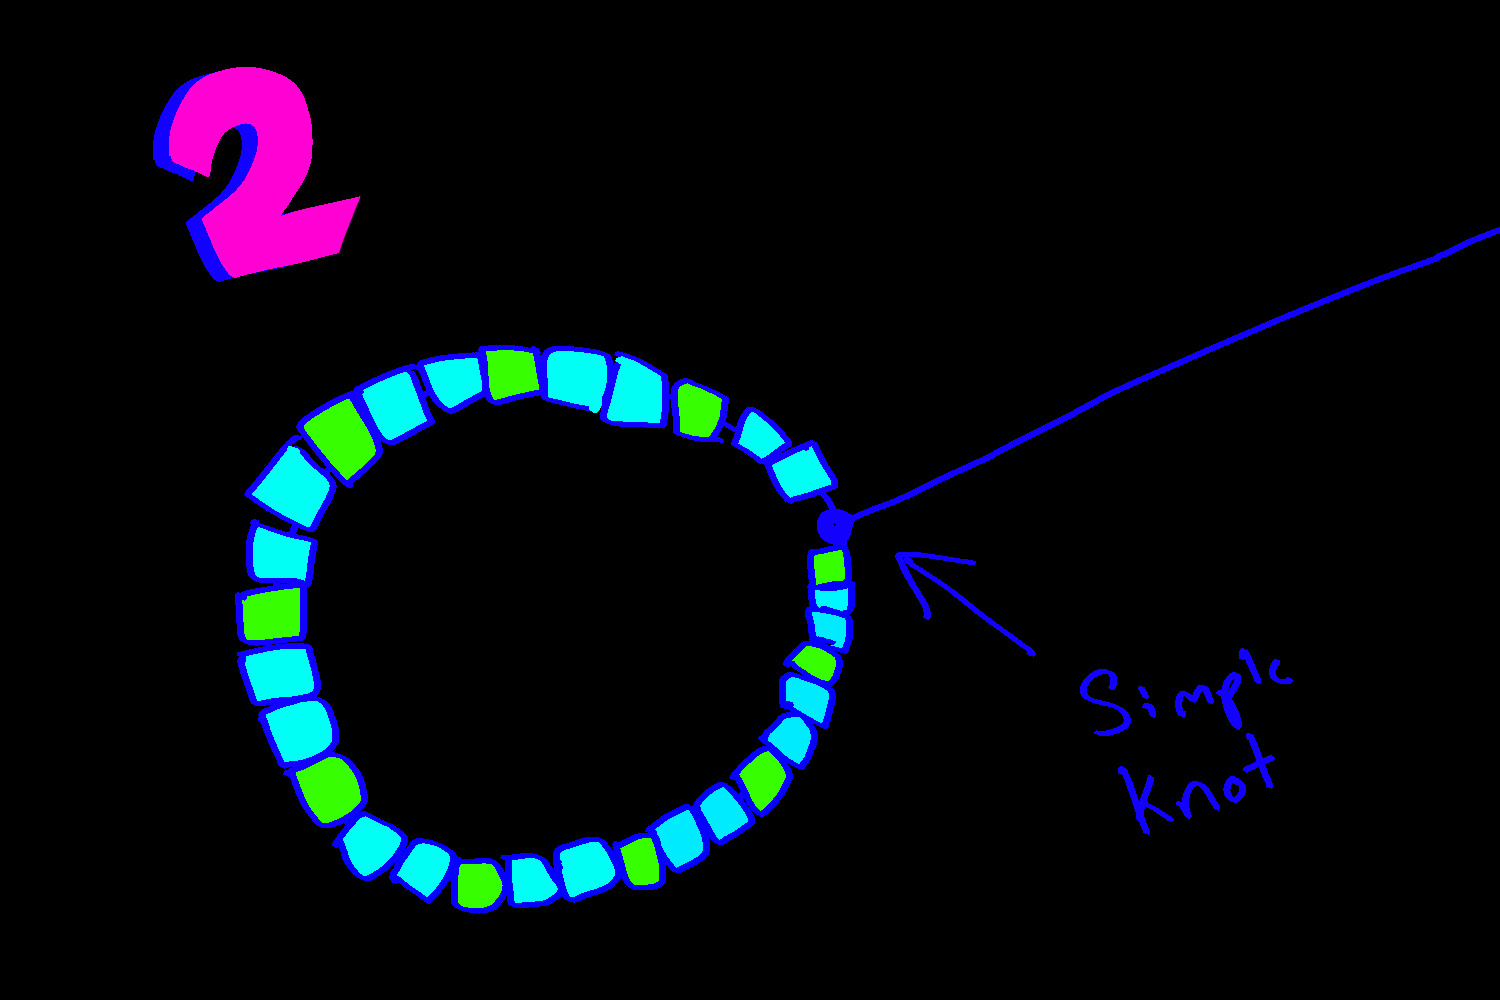
For step 2, tie the beads off like you are making a simple bracelet, but do not cut the cord.
Kandi (plastic bead jewelry) Thread  9cb03dec9e41809a6527f0ca15a78cc2e482b2ca

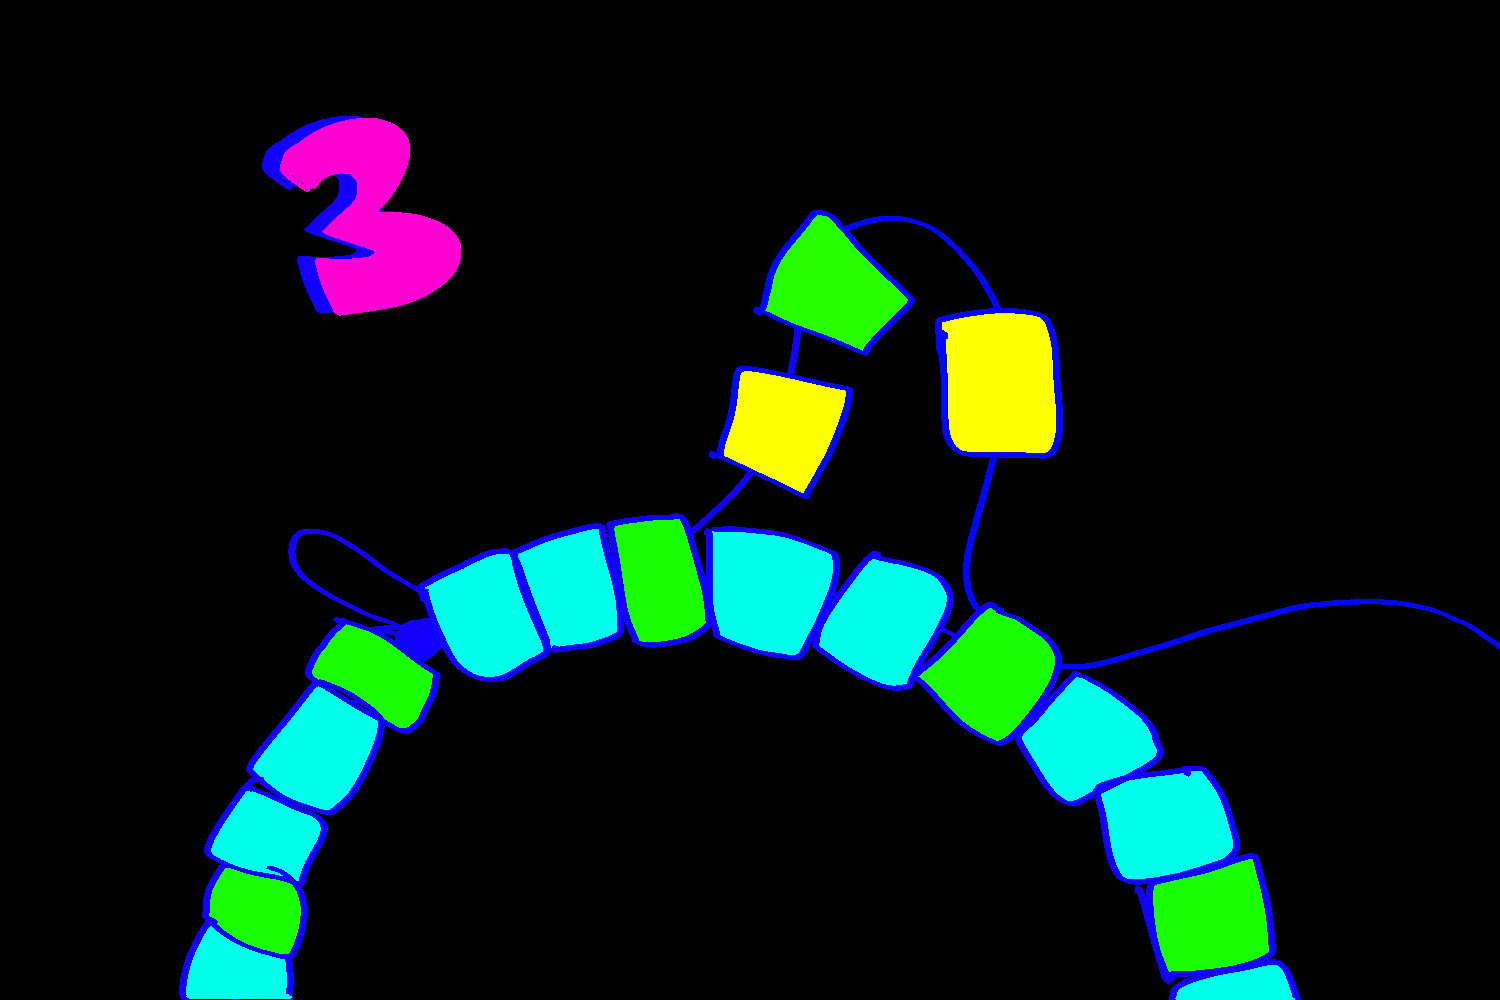
For step 3, begin making your interior x's by stringing the your cord back through your bracelet until it comes through an in between bead, then add 2 interior x beads and 1 in between bead in the pattern shown. String it through the next in between bead, and continue the pattern around your whole bracelet.
Kandi (plastic bead jewelry) Thread  Ed1edb0aa87dff1e0e01ef016c8432c0baa590b4

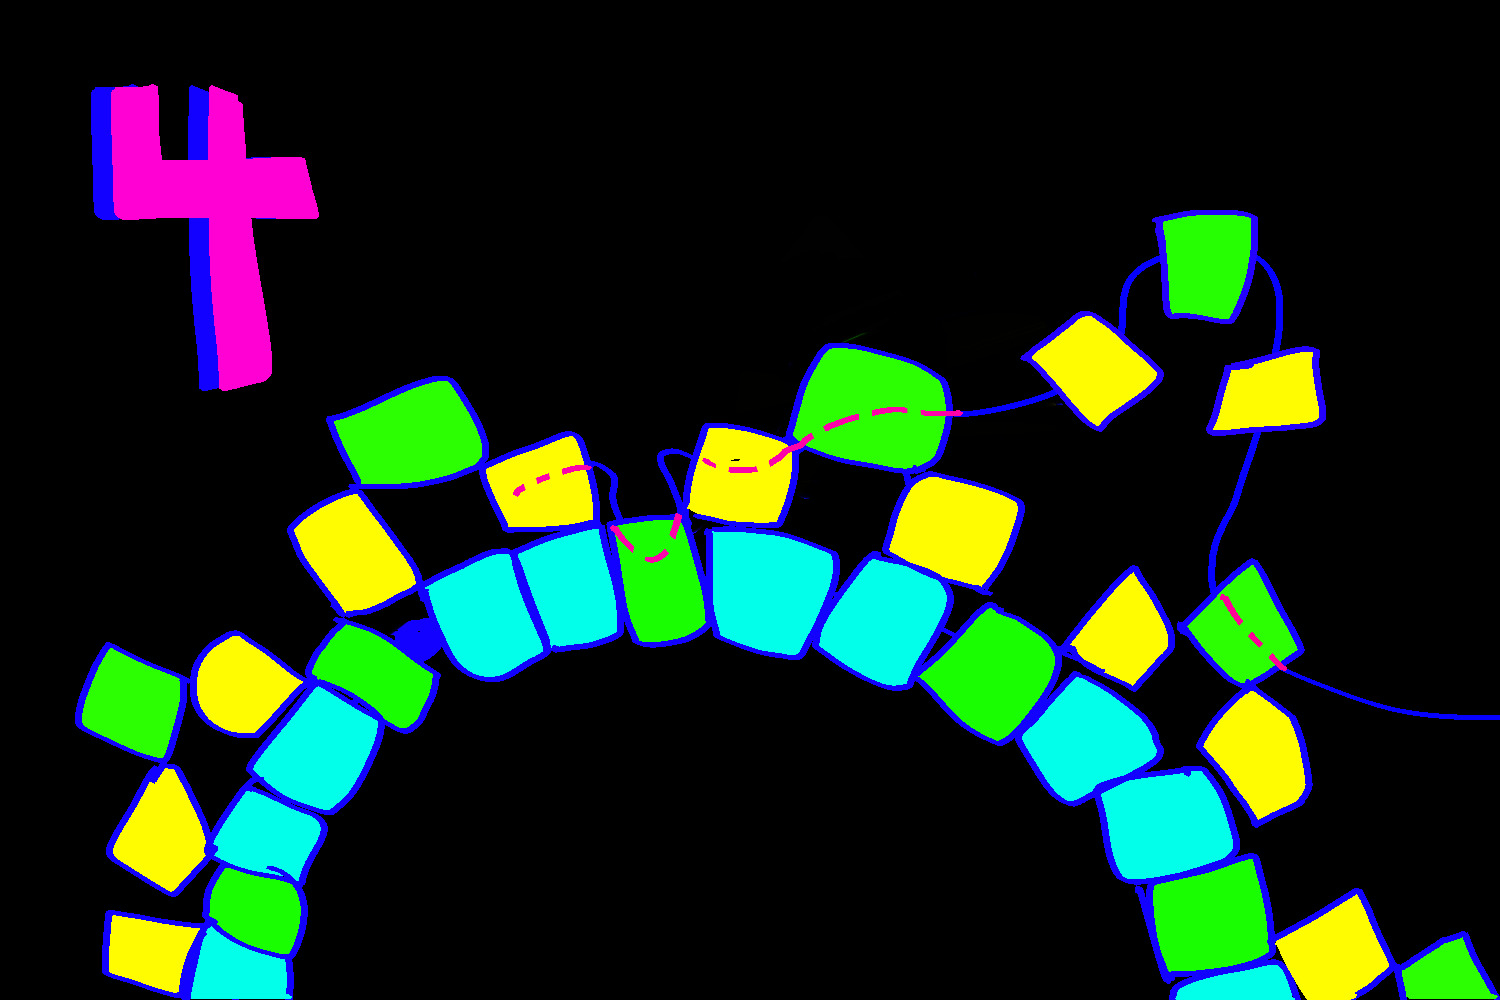
For step 4, string your cord back through beads as shown - the dotted lines represent going through a bead. Then, start stringing beads on in the same pattern, but this time using the in between beads at the top of your loops to secure them.
Kandi (plastic bead jewelry) Thread  5a852a84b60e01de426e65f025f2924b0da9c009

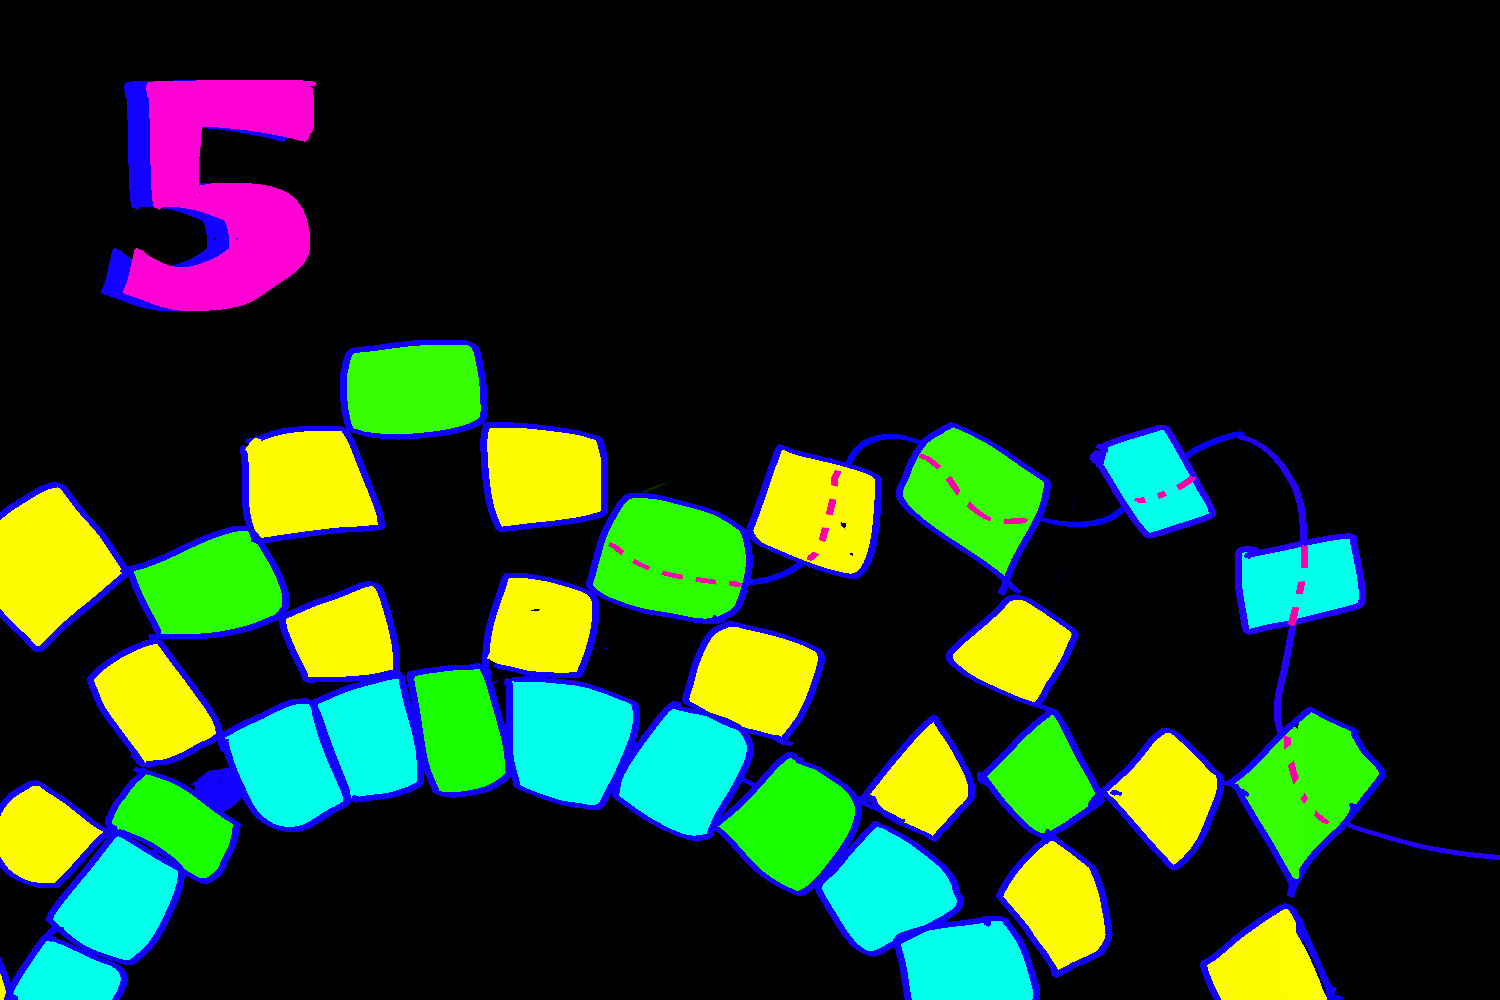
For step 5, once you've gone all the way around the bracelet with step 4, string your cord back through a few beads as shown and then start adding line beads in between all your in between beads on the top row. Once again, go all the way around your bracelet.
Kandi (plastic bead jewelry) Thread  91f828270ed0df1a1725c1c60e1304243f886bb0

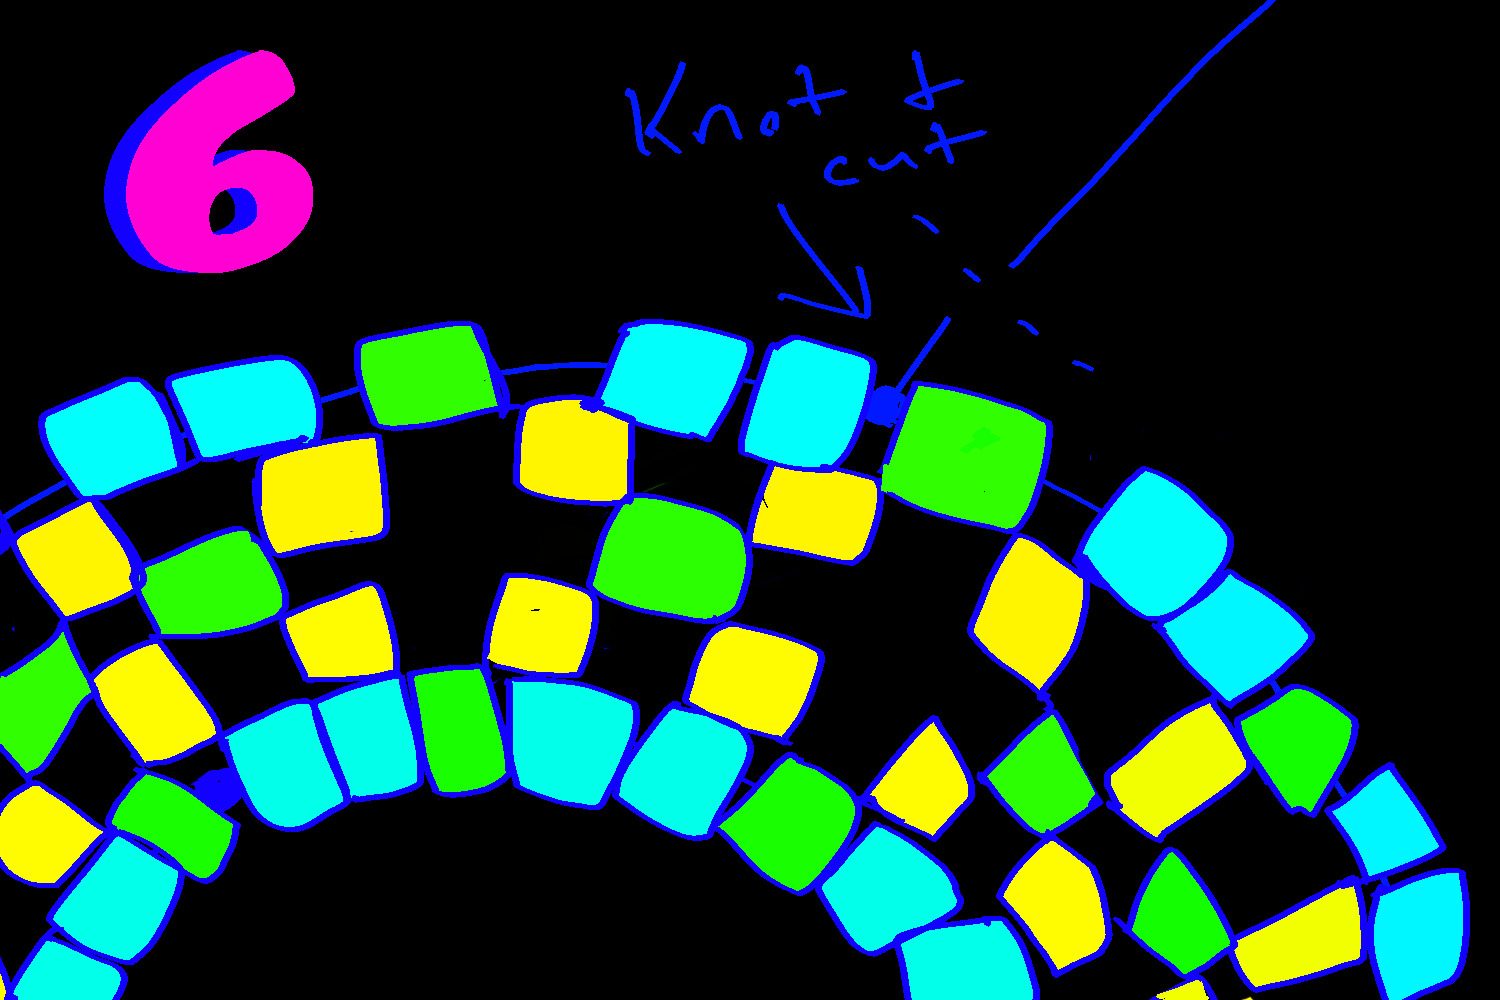
For step 6, make sure you've pulled everything tight, then tie a knot to secure your beads and cut off the extra string. At this point, you functionally have a complete bracelet and can stop. However, if you want to decorate it further, you can use the rest of the tutorial.
Kandi (plastic bead jewelry) Thread  3ba80d30fdd3ff11f610a47cbe5cf5311978c847

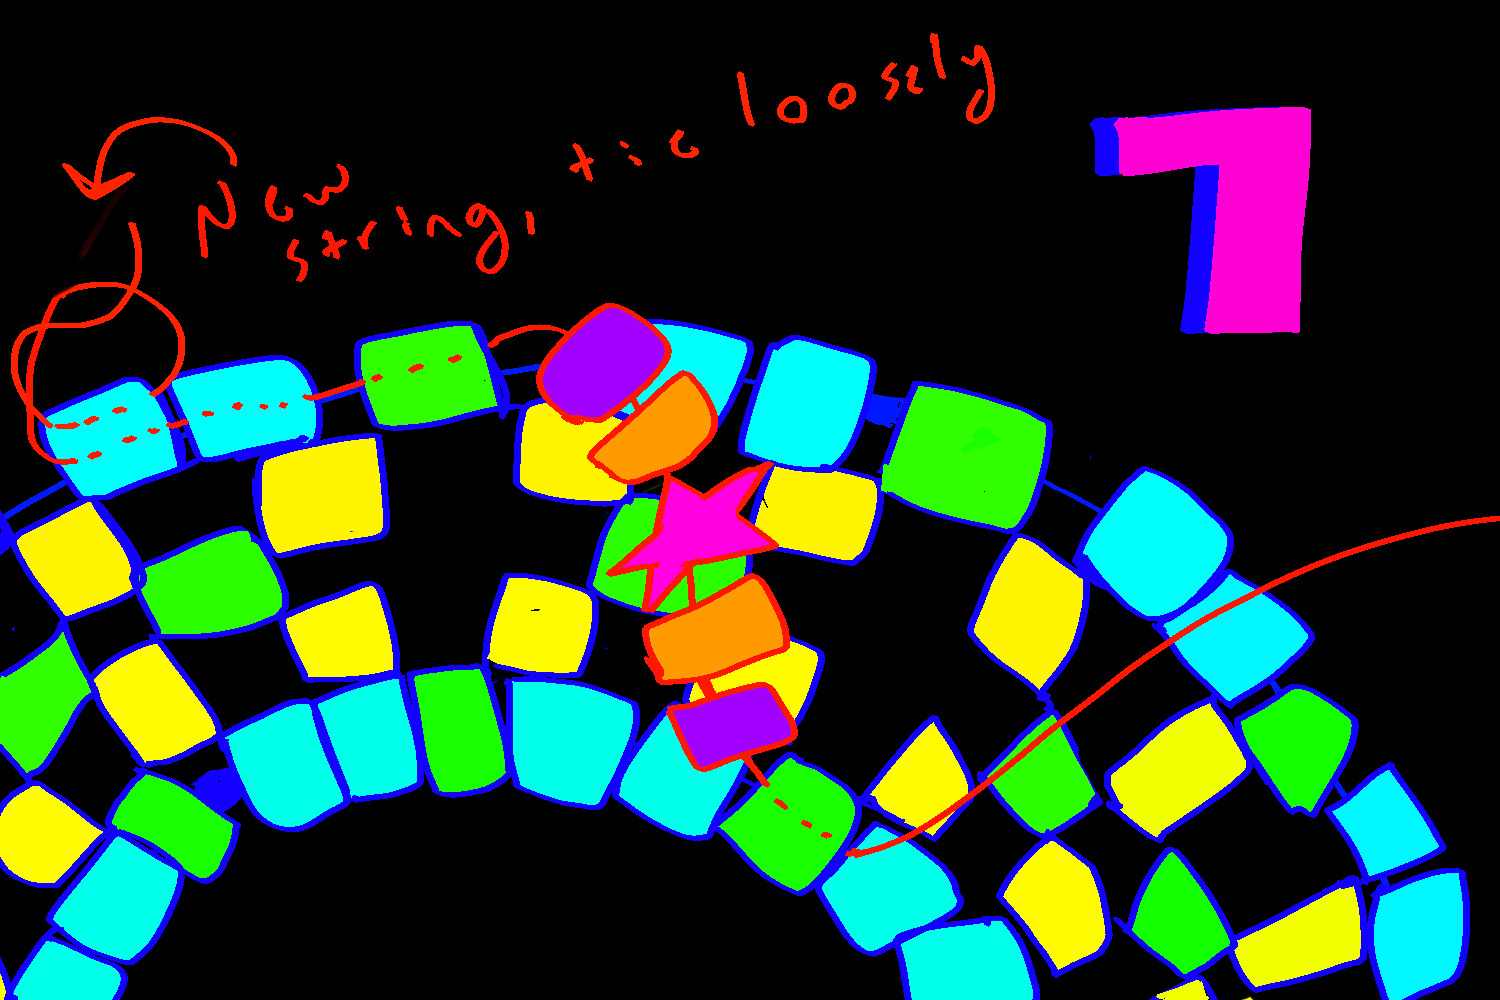
For step 7, get your second piece of string and tie it loosely around one of your line beads, then string it through to an accent bead as shown. The knot needs to be loose enough for you to untie later. Then, string on your 5 beads for one line of the 3D x, as shown. Continue this pattern around your kandi in a sort of zig-zag.
Kandi (plastic bead jewelry) Thread  7213493f2f1659b0b4f1bdf768307b981476688e

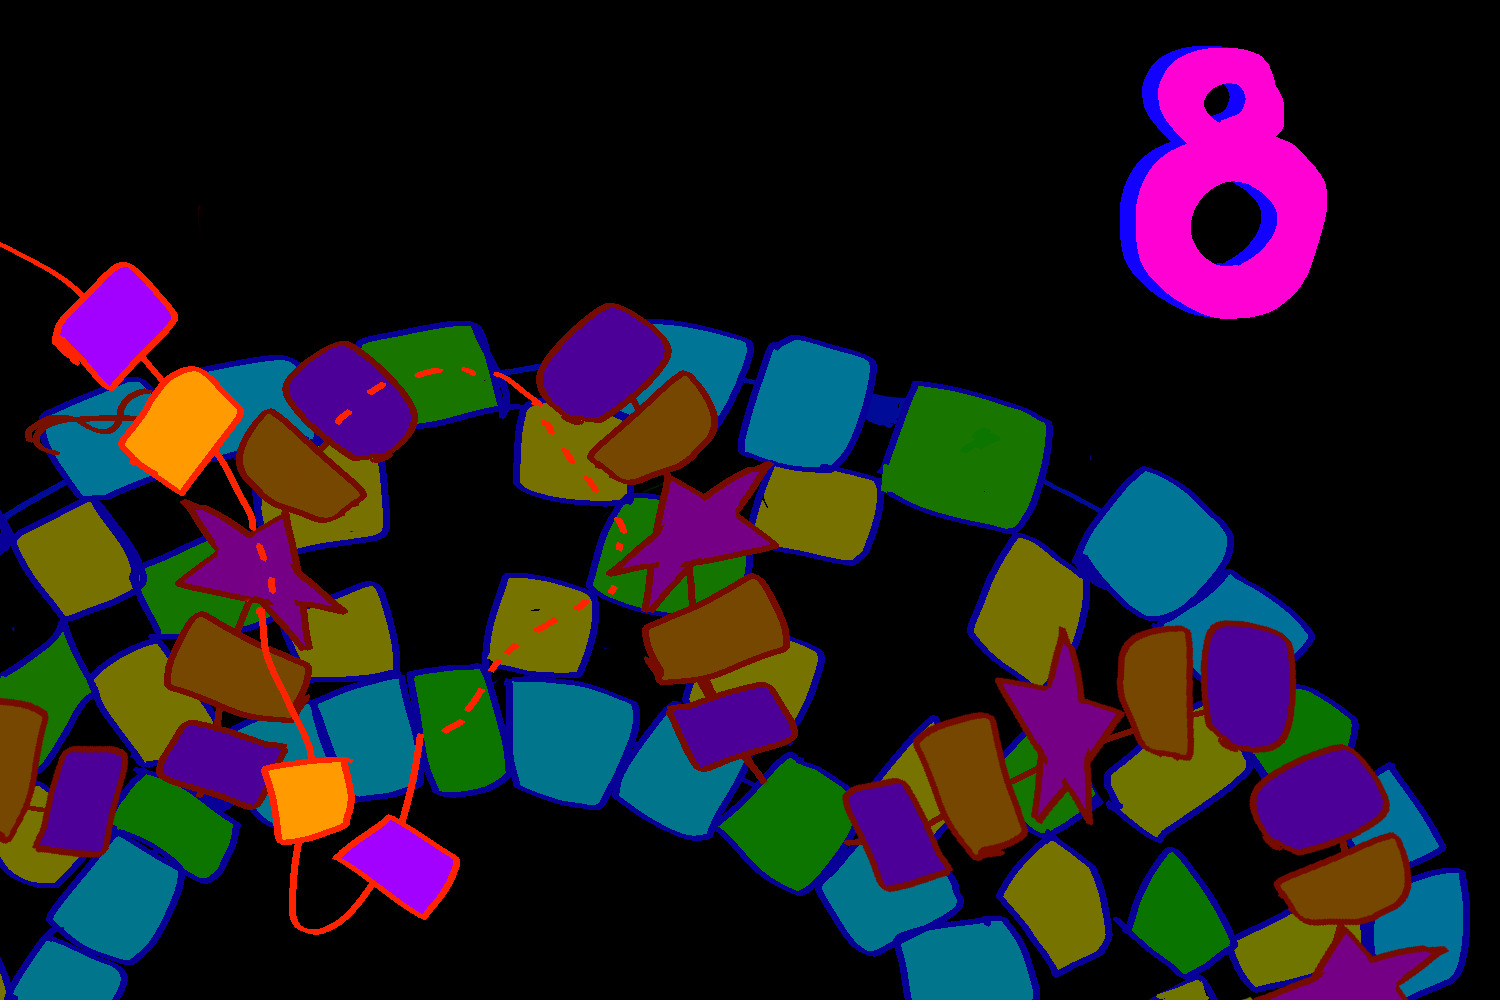
For step 8, string your cord back through several of the beads on the main cuff as shown until it comes out of an in between bead that hasn't yet had part of a 3D x attached to it. Then, put on 2 of your 3D x beads and string the cord through the accent bead. After that, put on the other 2 3D x beads and string it back through the next unused in between bead. Continue around your kandi to complete the pattern.
Kandi (plastic bead jewelry) Thread  Df7ee3396067bcc9958fac172e0e9bf72ac20e3e

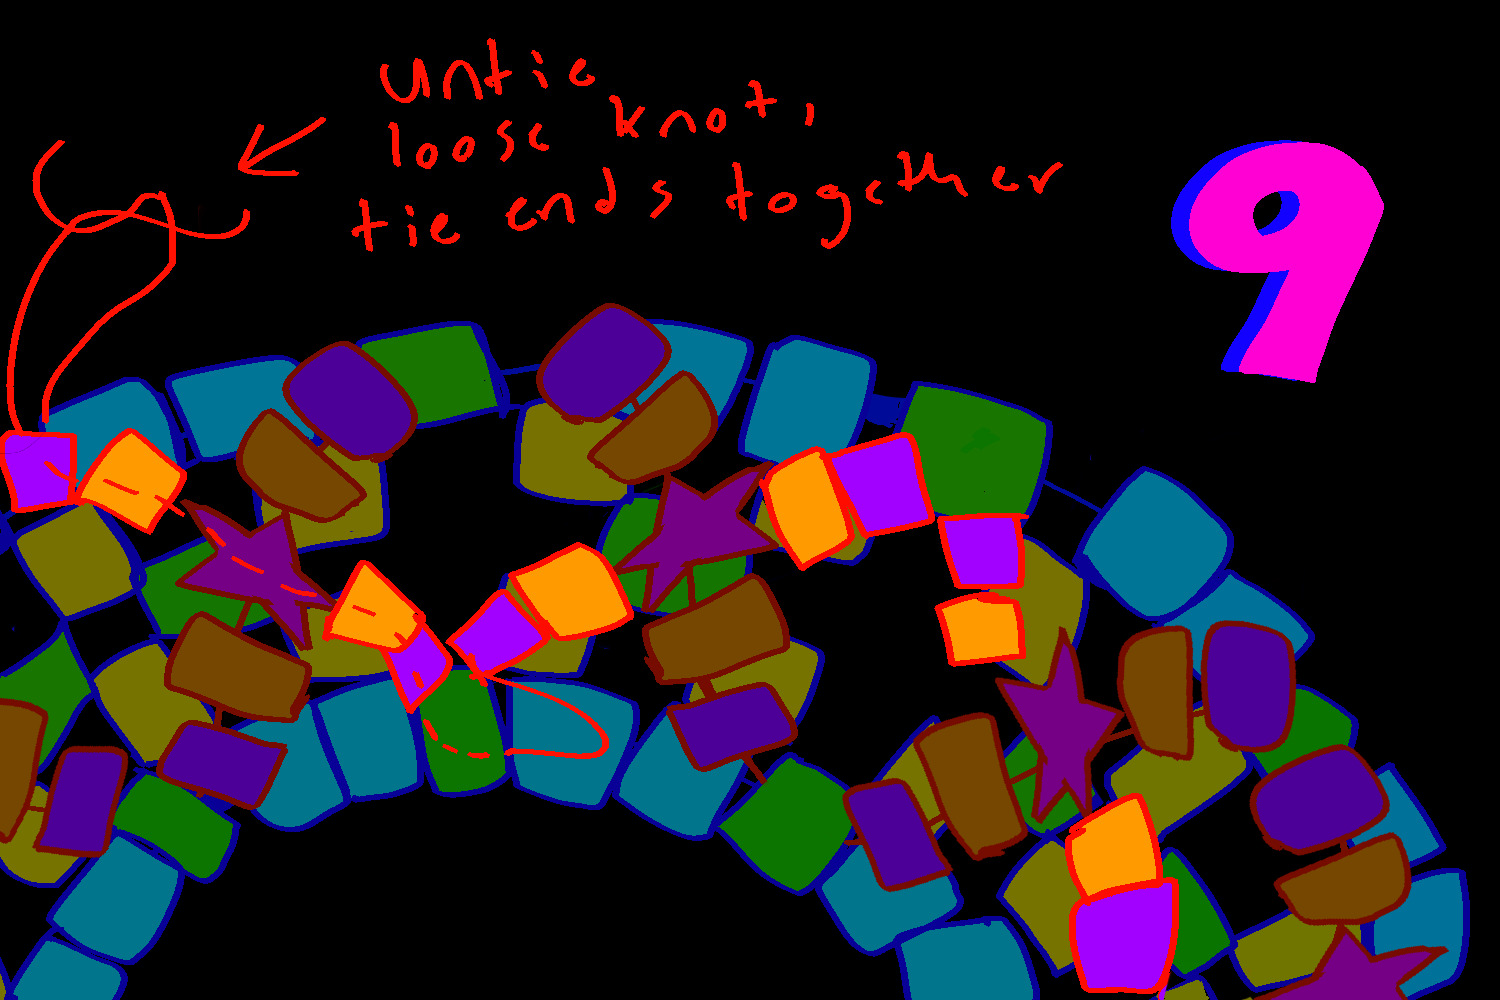
The final step after you've completed all of your 3D x's is to string your cord back through beads until it comes out near the loose knot you tied earlier. Then, untie the loose knot and tie both ends of the cord together, and trim off any excess. Your kandi is then finished!


Last edited by ocpdzim on Thu Aug 03, 2023 2:30 am; edited 2 times in total

sillyguycentral and venusambassador like this post

Back to top Go down
https://ocpdzim.neocities.org/
ocpdzim

ocpdzim


Posts : 63
Reputation : 0
Join date : 2023-07-18

Kandi (plastic bead jewelry) Thread  Empty
PostSubject: Re: Kandi (plastic bead jewelry) Thread    Kandi (plastic bead jewelry) Thread  I_icon_minitimeWed Jul 19, 2023 4:51 am

In this second post here, I will put links to other people's tutorials I saw and liked. A lot of these will be videos because I can mostly only find video tutorials - they're very well-made videos, though. It will be updated as I find more of them. If there's a specific step in a video you can't figure out, let me know and I may do a tutorial for you, because these ARE all videos I've used to make kandi.


Last edited by ocpdzim on Sat Aug 19, 2023 11:08 pm; edited 3 times in total
Back to top Go down
https://ocpdzim.neocities.org/
Totel
Admin
Totel


Posts : 207
Reputation : 2
Join date : 2023-07-02
Age : 26

Kandi (plastic bead jewelry) Thread  Empty
PostSubject: Re: Kandi (plastic bead jewelry) Thread    Kandi (plastic bead jewelry) Thread  I_icon_minitimeWed Jul 19, 2023 2:55 pm

woah, this looks so cool! :'D i've never worked with beads, but i'm curious to check it out. 👀

ocpdzim likes this post

Back to top Go down
https://art-anarchy.forumotion.me
ocpdzim

ocpdzim


Posts : 63
Reputation : 0
Join date : 2023-07-18

Kandi (plastic bead jewelry) Thread  Empty
PostSubject: Re: Kandi (plastic bead jewelry) Thread    Kandi (plastic bead jewelry) Thread  I_icon_minitimeSat Jul 29, 2023 11:45 pm

Hello, everyone! I have another tutorial for you today. This one is for a basic peyote cuff. These cuffs are flat with only one layer of beads, and have a tighter, sturdier feel to them than the x cuffs. You can make them with as many layers as you prefer and the process is the same, but I am using 4 for this tutorial.

Peyote cuffs take a LOT of string, so keep that in mind - the string shown in the tutorial is much shorter than you'll actually need because it's clearer what's going on that way. A peyote cuff is a very simple and easy cuff to make but also more time intensive than an x cuff.

Kandi (plastic bead jewelry) Thread  40096541ef1e0028d5986e3f4c48d57991e3af20

Since it's easier to understand what's happening if every band is a different color, I have used the nonbinary flag colors for this tutorial. The amount of beads you'll need depends entirely on the size of your wrist - for me, a cuff like this takes 20 beads for each band, so 80 for a 4 layer cuff like this, but I have very small wrists. Chances are you'll need more.

Kandi (plastic bead jewelry) Thread  A16172953bf7609d6f4b8d248a394b97b715a3c8

First, string one bead for your bottom band onto each end of your string. Then, gather the ends of your string together and string a single bead for your second band onto both ends of the string at the same time.

Kandi (plastic bead jewelry) Thread  07a03e423cbbe0971c1fbcff4a0ff10e82db1019

Second, repeat this process with your next two bands - one bead for band 3 on each end of the string, and a single bead for band 4 on both ends of the string at the same time.

Kandi (plastic bead jewelry) Thread  1df38666ab9685ec475b222a43bbffda4c59bc56

Next, choose an end of your string to work with. It doesn't matter which you start with. Put one band 4 bead onto the string and then thread it back through the band 3 bead that sticks out a little. Then, repeat that with bands 2 and 1.

Kandi (plastic bead jewelry) Thread  8f54d0a1a3025295c5411d2caf902b49a5094740

After that, repeat the process in the other direction. You'll keep repeating steps 3 and 4 until you run out of string or until the cuff is long enough that it will fit if you fold it around your wrist. If you run out of string on one side before the cuff is finished, start doing steps 3 and 4 on the other end of the string that's sticking out.

Kandi (plastic bead jewelry) Thread  C05cdbff4a9281cfea66a3698ab140989eafe184

Once your cuff is long enough to fit your wrist if folded around it, fit the edges together like a puzzle and pull one end of the string through to connect them, as shown. Then, pull it tight and tie a knot to fasten your bracelet. It's done!
Back to top Go down
https://ocpdzim.neocities.org/
ocpdzim

ocpdzim


Posts : 63
Reputation : 0
Join date : 2023-07-18

Kandi (plastic bead jewelry) Thread  Empty
PostSubject: Re: Kandi (plastic bead jewelry) Thread    Kandi (plastic bead jewelry) Thread  I_icon_minitimeThu Aug 03, 2023 2:29 am

I have another tutorial for you all today, at the request of a friend! This one is for making a classic flower cuff.
Kandi (plastic bead jewelry) Thread  9a54249e051be9f26f198e31af5741c14c24aafc

You'll need 6 beads for each flower's petals, plus 1 bead for each flower's center. Calculate accordingly.

Kandi (plastic bead jewelry) Thread  119ca8bffb24c8b8db109e8f85367b8795117f9f
First, start by making a single. You will need to put 3 beads for each of your flowers, they can be any color you like. A total of 30 beads (so, 10 flowers) is a pretty good size for most people but you can go bigger or smaller, as long as you stick with a multiple of 3. Tie it off like you would when making an x cuff, and cut off the short extra string but not the long extra string.

Kandi (plastic bead jewelry) Thread  3ec393a6ca847bbab671e2c82db81c00617f1b4a
Next, string through one of your outer petal beads, add a center bead, and string back through the next outer petal bead. Continue this pattern all the way around your cuff.

Kandi (plastic bead jewelry) Thread  B19ac292028d790166571ff6c53be865cfa8726f
Pull your cord tight enough that it starts to form the shape of the flowers, as shown. Then, tie it off. Tying it off here is crucial to get the shape right - don't skip this step! As before, cut off the short extra cord but keep the long extra cord.

Kandi (plastic bead jewelry) Thread  44a4d95adb644eb71c652d47fd1791062172d9be
Next, string through one of your petals to reach a center bead, then string through that center bead. Add 2 petal beads as shown, and string through the next center. Continue this pattern around your whole cuff.

Kandi (plastic bead jewelry) Thread  Beacfae3e86d60da7dbd30bdb6b4ac9f4bd612be
Once you've gone around the whole cuff, you'll once again tie it off, cut the short excess string, and keep the long excess string.

Kandi (plastic bead jewelry) Thread  13ccff47101d4a54fd8203b92baca338453327fb
I used a different color for the new bits here since it was getting hard to see, but don't worry, that doesn't mean anything. The last step is to string through the 2 petal beads that are now on top, add your final top petal bead, string back through the next 2 upper side petal beads, and continue this pattern all the way around. When you finish, tie it off and trim the loose cord ends. Your cuff is done!

MumiMoondrops likes this post

Back to top Go down
https://ocpdzim.neocities.org/
Sponsored content


Kandi (plastic bead jewelry) Thread  Empty
PostSubject: Re: Kandi (plastic bead jewelry) Thread    Kandi (plastic bead jewelry) Thread  I_icon_minitime

Back to top Go down
 
Kandi (plastic bead jewelry) Thread
Back to top 
Page 1 of 1
 Similar topics
-
» IX - art thread
» Zim's Art Thread
» bys's art thread
» Godot thread?
» Art history thread

Permissions in this forum:You cannot reply to topics in this forum
Art Anarchy :: Creative zone :: Crafts-
Jump to: